DIY Garment Series Part Two: The Elastic Waist Skirt
Posted by Ashley Daly on
Natasha Ball of House Sparrow Fine Nesting is back and she's has a lot to say about one of the simplest DIY apparel projects out there, the elastic waist skirt. So, sit back and enjoy reading her latest blog post about our sewing class - The Garment Series with Mary Make & Do.
Part Two: The Elastic Waist Skirt
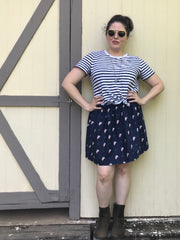
There is just something about clothes you made yourself. That’s something I suspected, or else I would never have pestered Bianca and Mary to help me transform my wardrobe from a fast-fashion faux pas to a me-made extravaganza. But now, having made this elastic-waist skirt, now I know for sure.
I know it so much that I wore this skirt to bed the night I made it. I couldn’t stand the thought of freshly sewed seams sitting in my closet, not being savored for every minute until finally, I had to admit that the garment has crossed a line and had to be considered laundry.
It was like the time my mom let me wear the new Nickelodeon sneakers with orange curly shoelaces she had just bought me right out of the store. Both times, I was Julia Roberts on Pretty Woman after her Rodeo Drive shopping spree, yelling BIG MISTAKE at everyone around me.
I love this feeling so much that I made another skirt just like the first one. The fact that that the skirt is so simple and quick to make is an added bonus.
How many of these skirts is it permissible to make and then own? The number goes to infinity if I add leggings in the fall and boots in the winter, right?
Say yes and check out Brett Bara's One-Hour Skirt tutorial by clicking here.
The formula for this skirt is beautiful in is simplicity. All you need is:
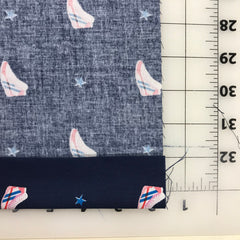
- enough fabric to equal 1-times-1.5 x your waistline divided by 2 (with something called a seam allowance added in—I added 1-1/2 inches because i wanted to be fancy and try French seams);
- a length of 1-inch elastic that wraps one time snugly around your torso where you want to wear the skirt;
- enough thread for sewing;
- and a few sewing-room basics (scissors, a sewing machine, a safety pin, sewing pins, and an iron and board).
The first step is to cut out two rectangles of fabric. I cut mine to measure half my waistline measurement times 1.5 x across (plus the seam allowance), then left the length of the skirt to be the width of the bolt. When you make your skirt, you can shorten this however you like. Just don’t forget to add your seam allowance.
I went to the ironing board next. First, I finger pressed a crease a quarter-inch inside the long side of of my rectangles. I ironed it down, and then I went back and creased again, this time 1-1/2 inches to the inside.
Making sure my fabric print was facing the same way on both of my rectangles, I went to my sewing machine and sewed French seams on both sides of the skirt. And Fancy was my name.
My skirt was tube-shaped already! I took this as a good sign.
Next I chose which side of my skirt would be the bottom. I first pinned and then sewed a seam there, working as close to the edge of the 1-1/2-inch crease that I made, working all the way around my tube.

You guys! A hem! A hem that I sewed!
I did the same steps at the waistband of my skirt, leaving a hole that measured 3 inches or so. I attached a large safety pin to the end of my elastic and worked it slowly but surely through the waistband. Once I had the elastic inside, I made sure it wasn’t twisted, and then I overlapped it by about an inch. I then sewed the elastic ends together, creating a box where the elastic overlapped.
Here’s the big finish! I let the elastic fall into place inside the waistband and closed my seam, back stitching here because I AM A REAL LADY. Just like Julia.
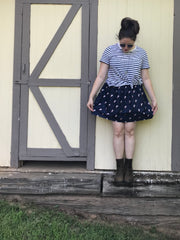
A skirt! A real, live skirt!

I have several fabrics stashed for more of these skirts, complete with plans to make leggings so I can turn this summer essential into an all-seasons event.
Until then, this is my official summer uniform. Day and (literally) night.